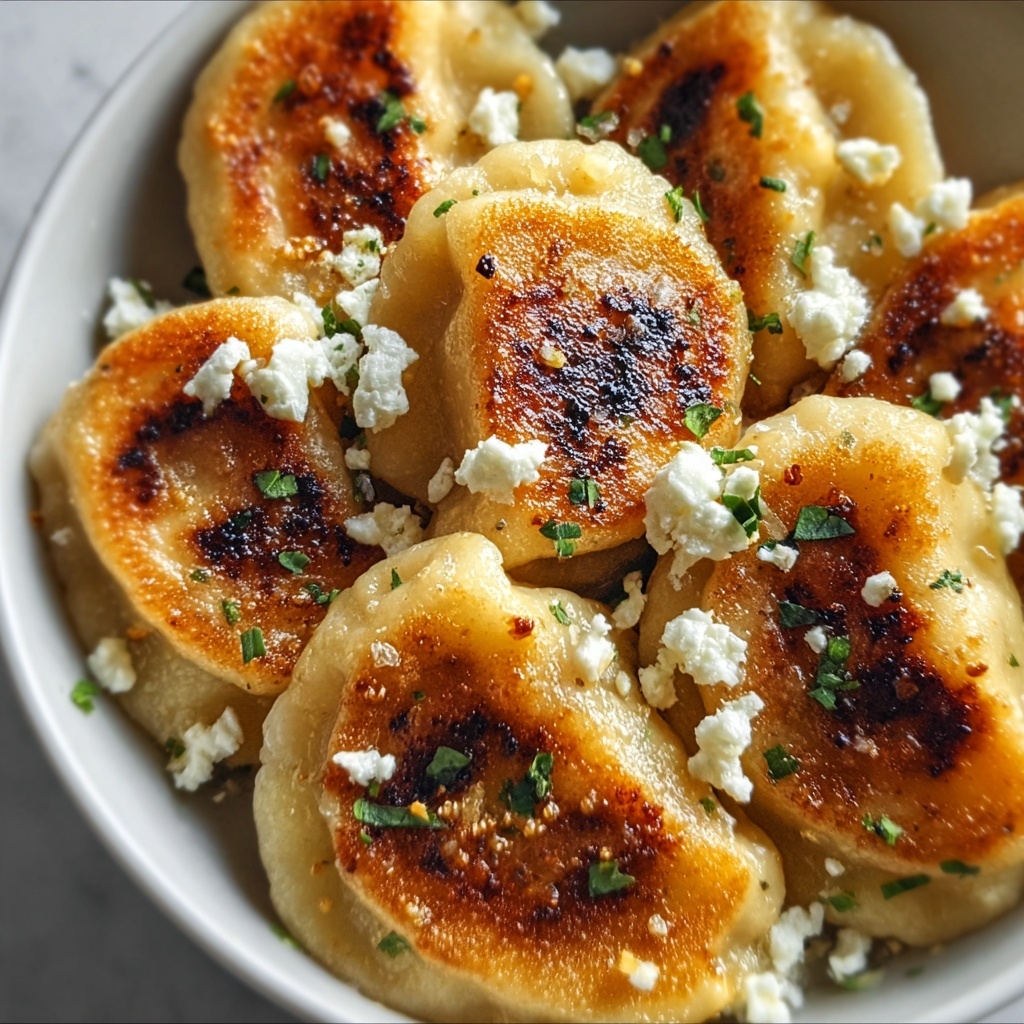
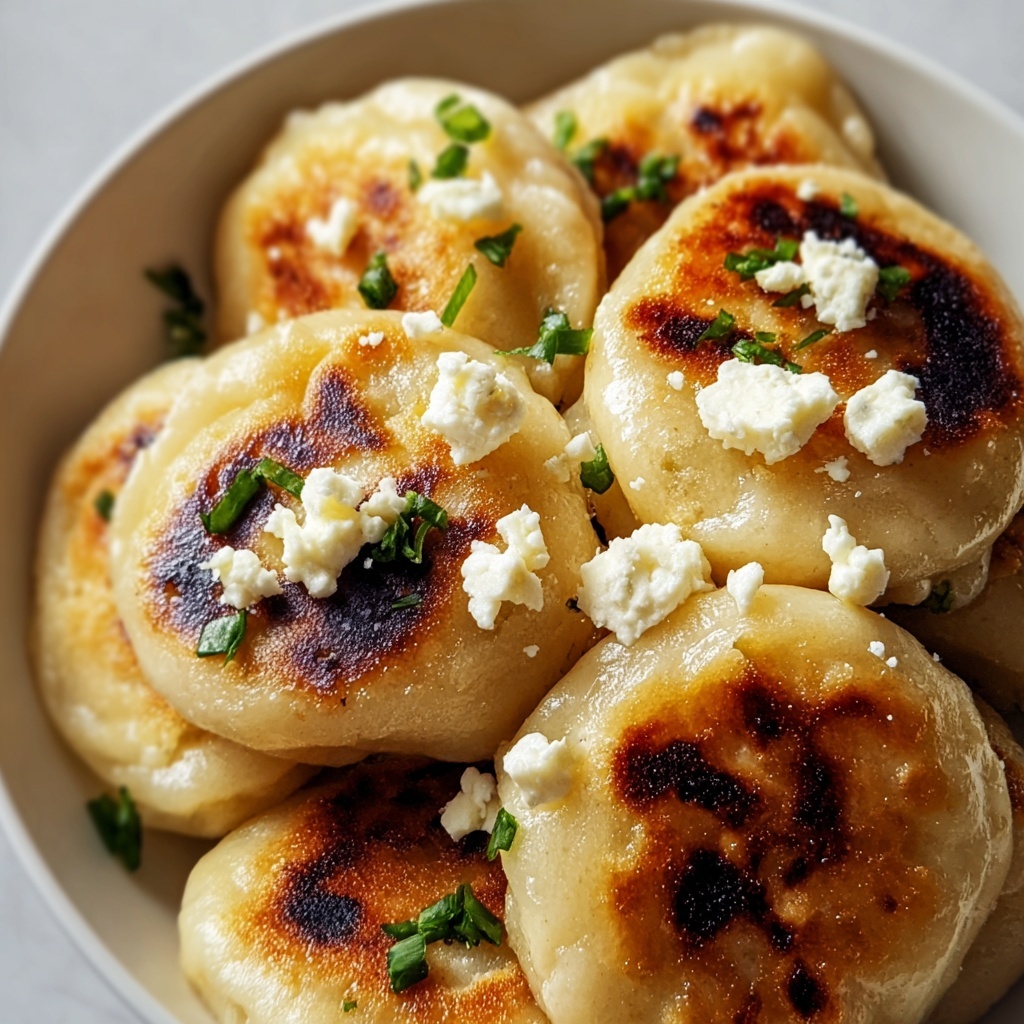
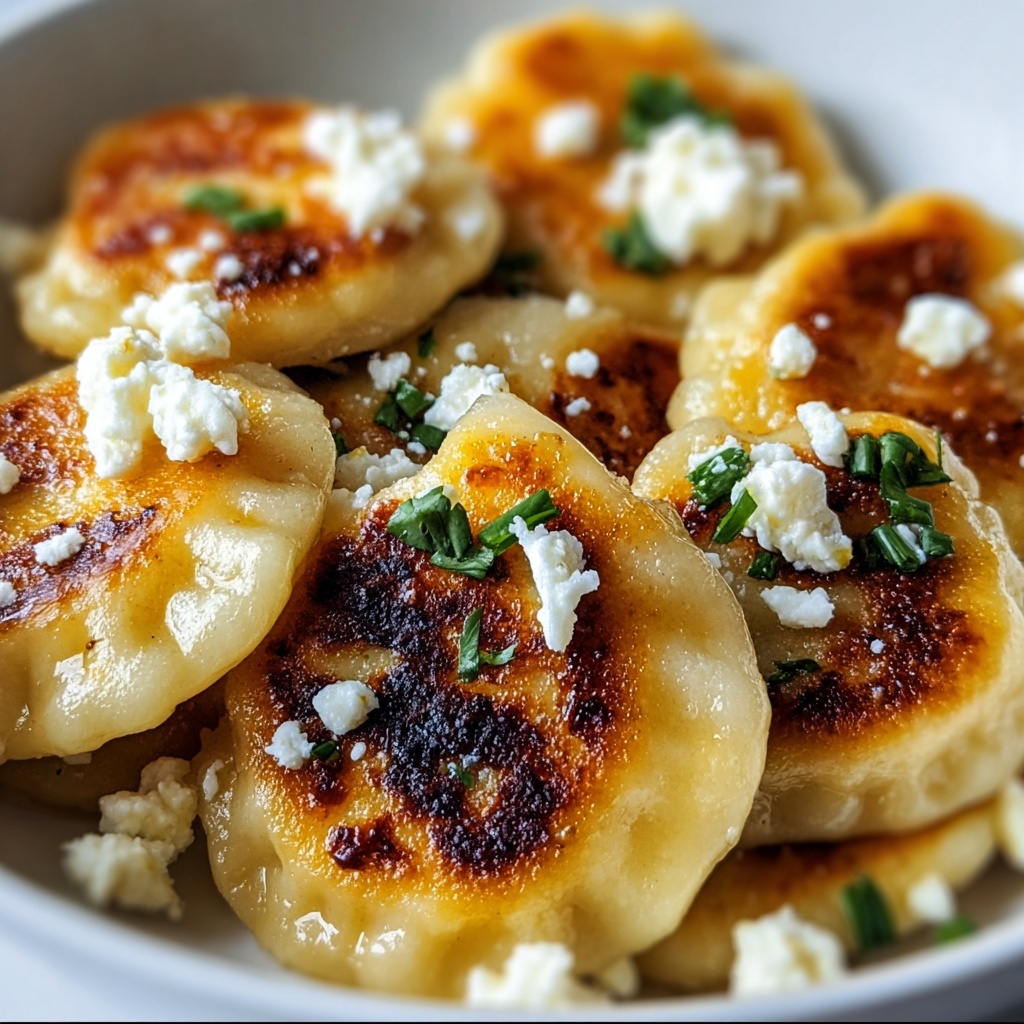
If you love the comforting, cozy feeling of homemade comfort food, you are going to adore this Roasted Butternut Squash and Feta Pierogi Recipe. Imagine tender, golden dumplings bursting with creamy, slightly sweet roasted butternut squash mingled with tangy feta cheese, all wrapped in delicate, pillowy dough. This recipe combines the best of fall flavors with a classic Eastern European favorite, creating a dish that is both heartwarming and bright with fresh ingredients. Whether you’re making dinner for your family or impressing friends at a weekend brunch, these pierogi will quickly become your go-to for a satisfying and delicious meal.
Ingredients You’ll Need
The magic of this Roasted Butternut Squash and Feta Pierogi Recipe lies in its simplicity and the quality of the ingredients. Each one plays a key role—whether it’s adding texture, flavor, or depth—to bring these pierogi to life in your kitchen.
- Butternut squash: Roasting enhances its natural sweetness and creates a creamy filling.
- Vidalia onion: Adds a mild, slightly sweet onion flavor that complements the squash.
- Dried thyme: Brings a subtle earthy note that deepens the filling’s flavor.
- Feta cheese: Offers a tangy, salty contrast that balances the sweetness of the squash perfectly.
- Salt and freshly ground black pepper: Essential for seasoning both the filling and dough.
- Olive oil: Used for roasting and sautéing, providing richness and helping flavor develop.
- All-purpose flour: The foundation for the tender yet durable pierogi dough.
- Warm milk and water: Hydrate the dough, ensuring it’s soft and pliable for rolling.
- Unsalted butter: Adds richness to the dough and is also used to sauté sage leaves for frying.
- Kosher salt: A pinch in the dough enhances all the flavors.
- Sage leaves: Frying them with butter creates an aromatic topping to elevate the finished pierogi.
How to Make Roasted Butternut Squash and Feta Pierogi Recipe
Step 1: Roast the Squash
Start by cutting your medium butternut squash in half and removing the seeds. Brush both sides generously with olive oil and season with salt and freshly ground black pepper. Roasting the squash for 50 to 60 minutes until fork tender not only softens it but also caramelizes its natural sugars, adding a beautifully rich depth to your pierogi filling.
Step 2: Sauté Onions and Add Thyme
While the squash is roasting, heat a tablespoon of olive oil in a pan and gently sauté your chopped Vidalia onion until it turns slightly golden—about five minutes. Stir in the dried thyme and cook for an additional minute. The radiant aroma of thyme combined with sweet onions will soon meld into the filling for a comforting, savory balance.
Step 3: Prepare the Filling
Once your squash is perfectly roasted, scoop the tender flesh into a food processor. Blend it until almost smooth, but still retaining a little texture. Add in the cooled onion and thyme mixture, crumbled feta cheese, salt, and pepper, then pulse 2-3 times. The result should be a wonderfully textured filling that tastes fresh, savory, and just the right hint of tanginess.
Step 4: Make the Dough
To create the dough, combine your all-purpose flour in a bowl and make a well in the center. Pour in very warm milk and melted unsalted butter. Gradually add warm water while mixing and kneading the dough for 10 to 15 minutes, aiming for a smooth and elastic ball. Cover the dough with a bowl and let it rest for 20 to 30 minutes—this resting period ensures your dough will roll out thin and hold together beautifully during cooking.
Step 5: Shape and Fill Your Pierogi
Divide the dough into quarters, keeping the pieces you’re not working on covered so they don’t dry out. Roll one quarter at a time very thin, similar to pasta dough, then cut circles using a cookie cutter or a large wine glass. Spoon about a teaspoon of the prepared filling in the center of each circle, then wet one edge with water and fold the dough over, sealing it firmly by pressing the edges together.
Step 6: Cook the Pierogi
Bring a large pot of salted water to a boil. Gently add the pierogi in batches, cooking them until they float to the surface, usually about 3 to 4 minutes. Carefully remove with a slotted spoon and place on a plate. They are delicious already, but there’s an optional step if you want to add a golden, crispy finish.
Step 7: Optional Frying for Extra Crispness
If you love a little crispness, dry the boiled pierogi slightly and then fry them in a pan with butter and extra virgin olive oil until each side is golden brown—usually about one minute per side. This step adds a delectable crunchy texture that contrasts beautifully with the soft, creamy filling.
How to Serve Roasted Butternut Squash and Feta Pierogi Recipe
Garnishes
For a truly special presentation, fry a few fresh sage leaves in butter until crispy and sprinkle them over your pierogi along with a light dusting of cracked black pepper. This herbal touch infuses every bite with warm, aromatic notes that highlight the earthy flavors inside the dumplings.
Side Dishes
These pierogi are wonderful served alongside a crisp green salad or roasted vegetables to keep the meal bright and balanced. Creamy sour cream or a tangy Greek yogurt dip can also complement the richness of the pierogi beautifully.
Creative Ways to Present
For a fun twist, consider serving these pierogi as appetizers by skewering two or three with a sprig of fresh herbs. Or pile them high in a rustic bowl drizzled with browned butter and topped with toasted walnuts for a cozy fall-inspired feast.
Make Ahead and Storage
Storing Leftovers
Leftover pierogi keep wonderfully in the refrigerator for up to three days. Store them in an airtight container to maintain their moist, tender texture and avoid them drying out.
Freezing
This Roasted Butternut Squash and Feta Pierogi Recipe is perfect for freezing. Lay the uncooked, filled pierogi flat on a baking sheet—making sure none are touching—and freeze until solid. Transfer them to a freezer bag for up to three months. This way, you can enjoy fresh pierogi anytime without starting from scratch.
Reheating
To reheat, boil frozen pierogi directly from the freezer until they float. Alternatively, pan-fry them in butter for a crisp finish. Either method refreshes their flavors and textures wonderfully.
FAQs
Can I use other types of cheese instead of feta?
Absolutely! While feta offers a distinct tang and saltiness that complements the squash, you can experiment with ricotta, goat cheese, or even a mild mozzarella depending on your preference. Just keep in mind these will change the flavor profile slightly.
Is it necessary to roast the butternut squash first?
Yes, roasting the squash enhances its natural sweetness and gives the filling a creamy texture. Boiling or steaming can make it too watery, which affects the dough and final consistency.
Can I freeze cooked pierogi?
While you can freeze cooked pierogi, they tend to stick together and may lose some texture upon reheating. We recommend freezing them uncooked for the best results when you’re ready to enjoy them fresh.
How thin should I roll the dough?
The dough should be rolled out as thin as pasta—about 1/8 inch thick. This ensures the pierogi are tender but sturdy enough to hold their filling during boiling and optional frying.
What’s the best way to prevent pierogi from sticking during cooking?
Make sure to add them gently into boiling salted water and stir occasionally but lightly to keep them from sticking to each other or the pot. Using a large pot with plenty of water also helps them cook evenly.
Final Thoughts
This Roasted Butternut Squash and Feta Pierogi Recipe is a wonderful way to bring warmth and flavor into your kitchen with something a little different yet comforting. It’s perfect for cozy nights in or sharing with loved ones during special gatherings. Once you try these tender, flavorful dumplings filled with that perfect balance of sweet squash and tangy feta, you’ll find yourself reaching for this recipe again and again. Happy cooking!
Print
Roasted Butternut Squash and Feta Pierogi Recipe
- Prep Time: 30 minutes
- Cook Time: 1 hour 15 minutes
- Total Time: 1 hour 45 minutes
- Yield: 4 servings (about 24 pierogi)
- Category: Main Dish
- Method: Roasting
- Cuisine: Eastern European
Description
Delicious homemade roasted butternut squash and feta pierogi featuring a creamy, flavorful filling encased in tender dough. This recipe involves roasting the squash to bring out its natural sweetness, blending it with caramelized onions, thyme, and tangy feta, then encasing the filling in a delicate dough before boiling and optionally frying for a golden finish. Perfect as a comforting appetizer or main dish with crispy sage butter on top.
Ingredients
Filling
- 1 medium butternut squash (about 3 cups if using cut up)
- 1 Vidalia onion, chopped
- 1/2 teaspoon dried thyme
- 1 cup feta cheese
- 1/2 teaspoon salt (plus more for roasting squash)
- Freshly ground black pepper, to taste
- 2 tablespoons olive oil (divided)
Dough
- 3 cups all-purpose flour
- 1/2 cup very warm milk
- 1/2 to 3/4 cup very warm water (adjust as needed)
- 1 tablespoon unsalted butter, melted
- Pinch kosher salt
For Frying and Serving
- 1 tablespoon unsalted butter
- 1 tablespoon extra virgin olive oil
- 6 sage leaves
Instructions
- Prepare the Filling: Cut the butternut squash in half and remove the seeds. Brush each cut side with 1 tablespoon of olive oil and season with salt and freshly ground black pepper. Roast the squash cut side down for 50-60 minutes in a preheated oven until fork tender.
- Sauté the Onion and Thyme: While the squash roasts, heat 1 tablespoon of olive oil in a skillet over medium heat. Add chopped Vidalia onion and cook until slightly browned, about 5 minutes. Add dried thyme and cook for another minute. Remove from heat and let cool.
- Process the Filling: Once the squash is cool enough to handle, scoop the flesh into a food processor. Pulse until nearly smooth, about 1 minute. Add the cooled onion and thyme mixture, feta cheese, 1/2 teaspoon salt, and freshly ground black pepper to taste. Pulse 2-3 times to combine but retain some texture. Adjust seasoning as needed.
- Make the Dough: In a large mixing bowl, place the flour and pinch of kosher salt. Create a well in the center and add warm milk and melted butter. Gradually add the warm water while mixing, forming a dough. Knead the dough for about 10-15 minutes until smooth and elastic.
- Rest the Dough: Cover the kneaded dough with a bowl or cloth and let it rest for 20-30 minutes, allowing gluten to relax.
- Roll and Cut Dough Circles: Divide the rested dough into four quarters, keeping unused portions covered to prevent drying. Roll out one portion at a time on a floured surface until thin, similar to pasta dough. Use a cookie cutter or large wine glass to cut circles.
- Fill and Seal Pierogi: Place about 1 teaspoon of filling in the center of each dough circle. Wet the edge of one half of the circle with water and fold over to seal tightly, pressing out any air pockets.
- Boil the Pierogi: Bring a large pot of salted water to a boil. Carefully add the pierogi in batches. When they float to the surface, cook for an additional 2-3 minutes, then remove with a slotted spoon and drain well.
- Optional Frying: For crispy pierogi, dry boiled pierogi and fry in a skillet with 1 tablespoon unsalted butter and 1 tablespoon extra virgin olive oil over medium heat. Fry each side until golden brown, about 1 minute per side. Add more fat if necessary to prevent sticking.
- Sauté Sage and Serve: In the same pan used for frying, quickly sauté sage leaves until crisp. Serve the pierogi topped with the crispy sage and additional melted butter if desired.
Notes
- Roasting the butternut squash enhances its natural sweetness and depth of flavor, key to a delicious filling.
- If the dough is sticky, add flour gradually during kneading until it reaches a smooth, elastic consistency.
- Boiling pierogi until they float ensures they are cooked through before frying or serving directly.
- Frying the pierogi after boiling adds a delightful crispy texture but is optional based on preference.
- Use fresh sage leaves for the best flavor and crisp texture when sautéed.
- Store leftover pierogi in an airtight container; they can be reheated by boiling or pan frying.


