
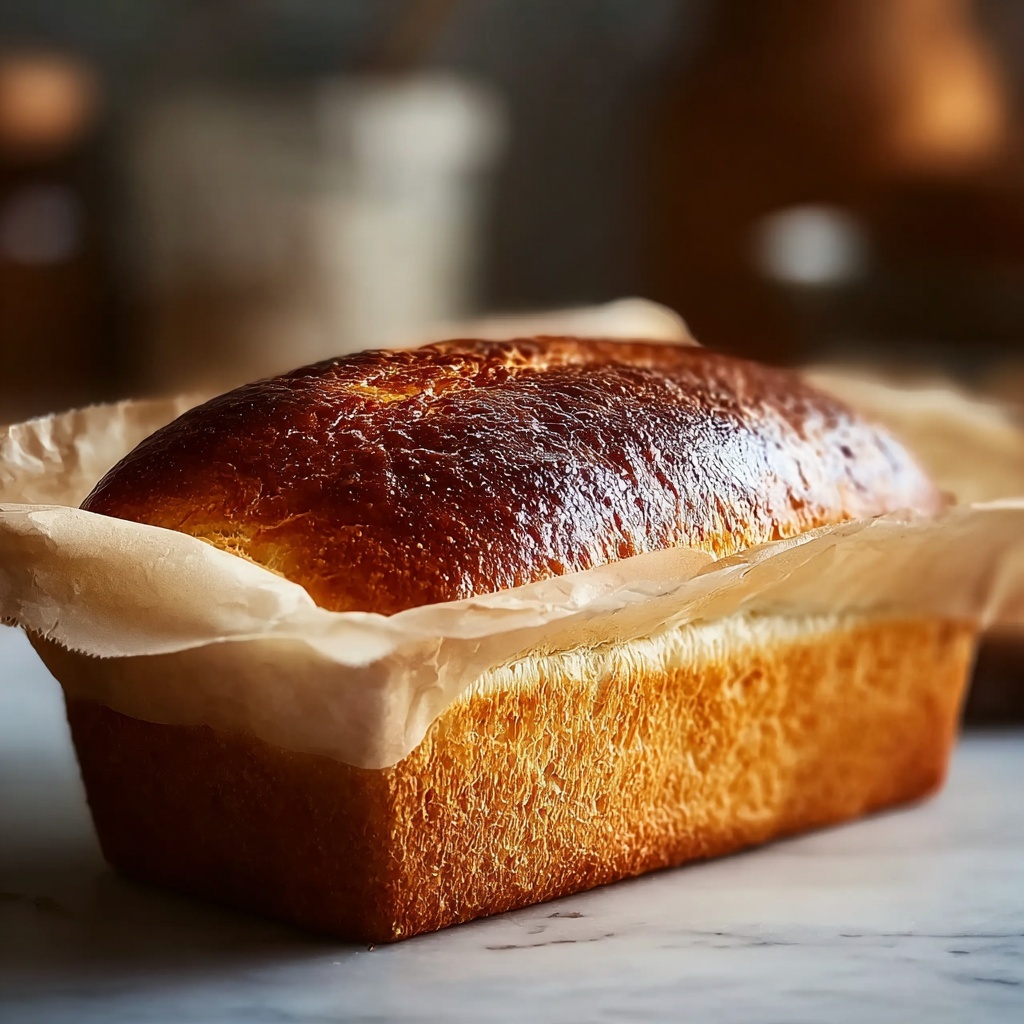
If you have ever dreamed of making fresh, fluffy bread at home without the usual mess or fuss, this Bread in a Bag Recipe is going to be your new best friend. It’s an incredibly straightforward way to combine simple ingredients, knead the dough without getting sticky fingers all over your counter, and enjoy the delightful aroma of homemade bread wafting through your kitchen. With minimal cleanup and a bit of patience, you’ll end up with a golden loaf that tastes like it came straight from your favorite bakery.
Ingredients You’ll Need
Each ingredient in this Bread in a Bag Recipe is carefully chosen to balance flavor, texture, and ease of preparation. You don’t need a pantry full of fancy items to make great bread; just a handful of staples that work beautifully together.
- Active dry yeast (1 packet / 2 1/4 tsp): This is the magic agent that makes your bread rise, creating those lovely airy pockets inside.
- Warm water (1/4 cup + extra 1/4 cup, 110°F): Essential for activating the yeast and blending the dough—it should be warm but not hot to avoid killing the yeast.
- All-purpose flour (3 cups): The backbone of your bread, providing structure and that perfect chewiness.
- Vegetable oil or melted butter (1/4 cup): Adds moisture and richness for a soft crumb and tender crust.
- Sugar (1/4 cup): Feeds the yeast and brings a subtle sweetness that balances the salt.
- Salt (1 tsp): Enhances the flavor and tightens the gluten network, giving the bread its structure.
- Warm milk (1/2 cup, 110°F): A dairy addition that enriches the dough, improving both texture and taste.
How to Make Bread in a Bag Recipe
Step 1: Activate the Yeast
Start by dissolving the yeast and sugar in 1/4 cup of warm water. This step wakes up the yeast, letting it bloom and get bubbly—an important sign that your bread will rise beautifully later on. A few minutes of patience here will pay off with a lively, yeasty loaf.
Step 2: Combine Dry Ingredients and Liquids in a Bag
Next, gather your flour, vegetable oil, salt, and warm milk in a large resealable plastic bag. Pour the bubbly yeast mixture into the bag as well, then seal it tightly. This is such a clever part of the Bread in a Bag Recipe because it reduces the mess and allows the dough to form right inside the bag without extra bowls.
Step 3: Knead the Dough in the Bag
Now it’s time to knead! With the bag sealed, use your hands to gently squeeze and massage the dough for 3 to 5 minutes. Watch the flour and liquids come together into a soft, elastic dough without any sticky residue on your countertop. This hands-on step is therapeutic and so satisfying.
Step 4: Let the Dough Rise
After kneading, leave the dough sealed in the bag and place it somewhere warm. In about an hour, you’ll notice the dough has doubled in size—proof that the yeast is working its magic. This rise is critical for a light texture and a deliciously airy crumb inside.
Step 5: Shape and Prepare for Baking
Once risen, gently open the bag and tip out the dough. With clean hands, shape it into a loaf that fits comfortably in your greased loaf pan. This shaping step sets the foundation for your bread’s final form and crust.
Step 6: Second Rise Before Baking
Place the shaped dough in the pan and let it rise again for 20 to 30 minutes, until puffy and soft. This second rise makes the bread tender and ensures a beautifully puffed loaf that’s ready to bake.
Step 7: Bake Until Golden
Preheat your oven to 350°F (175°C). Bake the loaf for 25 to 30 minutes, keeping an eye out for a golden crust. A good trick is to tap the bottom of the loaf once it’s out of the oven; if it sounds hollow, you know your bread is perfectly baked.
Step 8: Cool and Enjoy
Let your loaf cool on a wire rack before slicing. Cooling helps set the crumb and makes cutting easier, so resist the urge to dive right in. Fresh bread is one of life’s simple pleasures, and this Bread in a Bag Recipe delivers it in a way that’s accessible to everyone.
How to Serve Bread in a Bag Recipe

Garnishes
Freshly baked bread is wonderful on its own, but you can elevate it with a few simple garnishes. Consider brushing the crust with melted butter for a shiny finish or sprinkling coarse sea salt or herbs like rosemary or thyme before baking to add extra flavor and visual appeal. A light smear of garlic butter after baking is another quick upgrade that will have everyone asking for seconds.
Side Dishes
You can serve this bread alongside practically anything. It’s perfect for hearty soups and stews, where soaking up broth is part of the fun. It also pairs beautifully with creamy cheeses, salads, and your favorite deli meats. For a cozy meal, try it with a classic tomato soup or a fresh garden salad for balance.
Creative Ways to Present
Feeling adventurous? Turn this loaf into individual sandwich rolls or mini buns by dividing the dough before the second rise. You could also slice it thinly, toast it, and top with everything from avocado to smoked salmon for an elegant appetizer. This Bread in a Bag Recipe is versatile enough to adapt to whatever your culinary mood inspires.
Make Ahead and Storage
Storing Leftovers
Your homemade bread will stay fresh for a couple of days when stored properly. Wrap it tightly in plastic wrap or place it inside an airtight container to keep the crust soft and the crumb moist. Avoid leaving it out uncovered, as bread tends to dry out quickly in the open air.
Freezing
If you want to make this bread well in advance or preserve leftovers, freezing is your best friend. Slice the loaf first for easy thawing, then wrap individual slices or the whole loaf in freezer-safe bags. When ready to enjoy, just pop the frozen slices directly into a toaster or thaw the loaf overnight in the refrigerator.
Reheating
To bring back that freshly baked warmth, reheat your bread in a conventional oven at 350°F for about 10 minutes. For quick bites, a toaster or toaster oven works beautifully, especially if you want a crusty exterior and soft inside. Avoid microwaving as it can make the bread rubbery.
FAQs
Can I use this recipe without a plastic bag?
Absolutely! While the Bread in a Bag Recipe is designed for mess-free kneading in a bag, you can knead the dough on a lightly floured surface if you prefer. The bag just makes cleanup easier and is a fun twist on traditional bread-making.
What if my dough doesn’t rise?
The most common reason is that the yeast wasn’t activated properly—too hot or cold water can kill or slow down the yeast. Make sure your water temperature is around 110°F and watch for bubbling after mixing yeast and sugar. Also, check the expiration date on your yeast packet.
Can I substitute whole wheat flour in this recipe?
You can swap part or all of the all-purpose flour for whole wheat, but keep in mind this will change the texture and flavor. Whole wheat flour absorbs more water and can make the loaf denser, so you might need to adjust liquids slightly and knead a bit longer.
How do I know when the bread is fully baked?
A classic test is tapping the bottom of the loaf; if it sounds hollow, it’s done. The crust should be golden brown and firm to the touch. Using an instant-read thermometer, the internal temperature should be around 190°F to 200°F for perfectly baked bread.
Can I add extras like nuts or herbs?
Definitely! Adding chopped nuts, seeds, dried herbs, or even bits of cheese into the dough can personalize your loaf and add exciting flavors. Just mix them in after the first rise before shaping the dough for baking.
Final Thoughts
Baking bread doesn’t have to be complicated or intimidating, and this Bread in a Bag Recipe brilliantly proves just that. It’s a joyful process that invites you to roll up your sleeves, get hands-on, and enjoy the simple satisfaction of turning a few pantry staples into a warm loaf of bread bursting with flavor. Trust me, once you try this approach, you’ll wonder why you ever bought bread from the store!
Print
Bread in a Bag Recipe
- Prep Time: 15 minutes
- Cook Time: 30 minutes
- Total Time: 1 hour 45 minutes
- Yield: 1 loaf (about 12 slices)
- Category: Bread
- Method: Baking
- Cuisine: American
Description
This easy Bread in a Bag recipe simplifies bread making by allowing you to mix and knead the dough inside a resealable plastic bag. The dough rises twice for a fluffy, soft loaf baked to golden perfection.
Ingredients
Yeast Mixture
- 1 packet (2 1/4 tsp) active dry yeast
- 1/4 cup warm water (110°F)
- 1/4 cup sugar
Dough
- 3 cups all-purpose flour
- 1/4 cup vegetable oil (or melted butter)
- 1 tsp salt
- 1/2 cup warm milk (110°F)
Instructions
- Dissolve Yeast: In a small bowl, dissolve the active dry yeast and sugar in 1/4 cup warm water (110°F). Let it sit for about 5 minutes until the mixture becomes bubbly, indicating the yeast is active.
- Combine Ingredients in Bag: Add the 3 cups of all-purpose flour, 1/4 cup vegetable oil, 1 tsp salt, and 1/2 cup warm milk (110°F) into a large resealable plastic bag.
- Add Yeast Mixture and Knead: Pour the bubbly yeast mixture into the plastic bag with the dry and wet ingredients. Seal the bag tightly and gently knead the mixture inside for 3-5 minutes, until the dough forms and is smooth and elastic.
- First Rise: Let the sealed bag rest in a warm place for about 1 hour, allowing the dough to rise and double in size.
- Shape Dough: Once the dough has doubled, carefully remove it from the bag and shape it into a loaf shape with your hands.
- Preheat Oven: Preheat your oven to 350°F (175°C) while you prepare the dough for the second rise.
- Second Rise: Grease a loaf pan and place the shaped dough inside. Cover and let it rise for another 20-30 minutes until it doubles in size again.
- Bake: Bake the loaf in the preheated oven for 25-30 minutes, until the top turns golden brown and it sounds hollow when tapped.
- Cool: Remove the loaf from the oven and place it on a wire rack to cool completely before slicing.
Notes
- Use warm water and milk at about 110°F to activate the yeast properly.
- Ensure the plastic bag is sealed well during kneading and rising to avoid messes.
- You can substitute vegetable oil with melted butter for a richer flavor.
- Allow the bread to cool completely before slicing to maintain its structure.
- Optional: Add herbs or seeds to the dough for added flavor and texture.


