
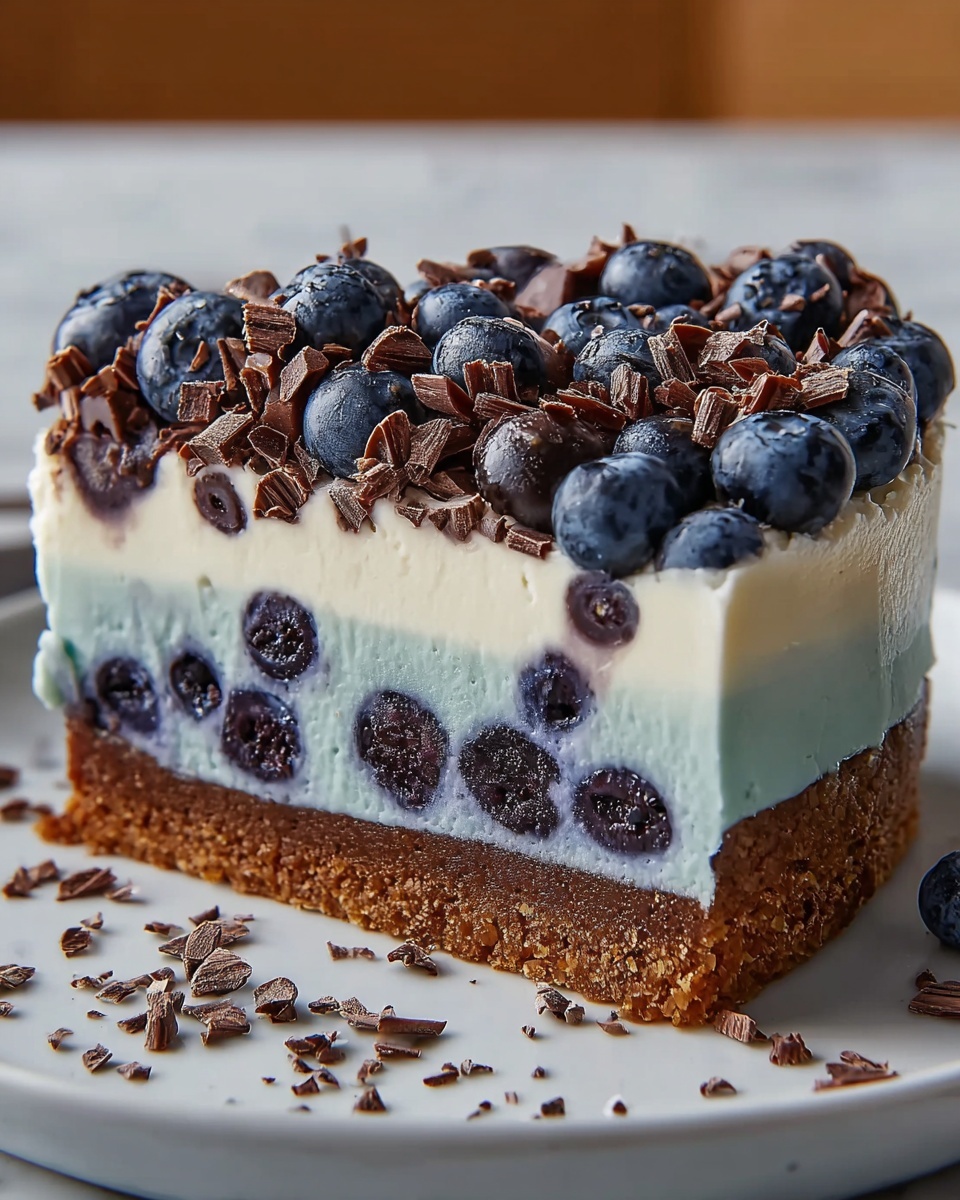
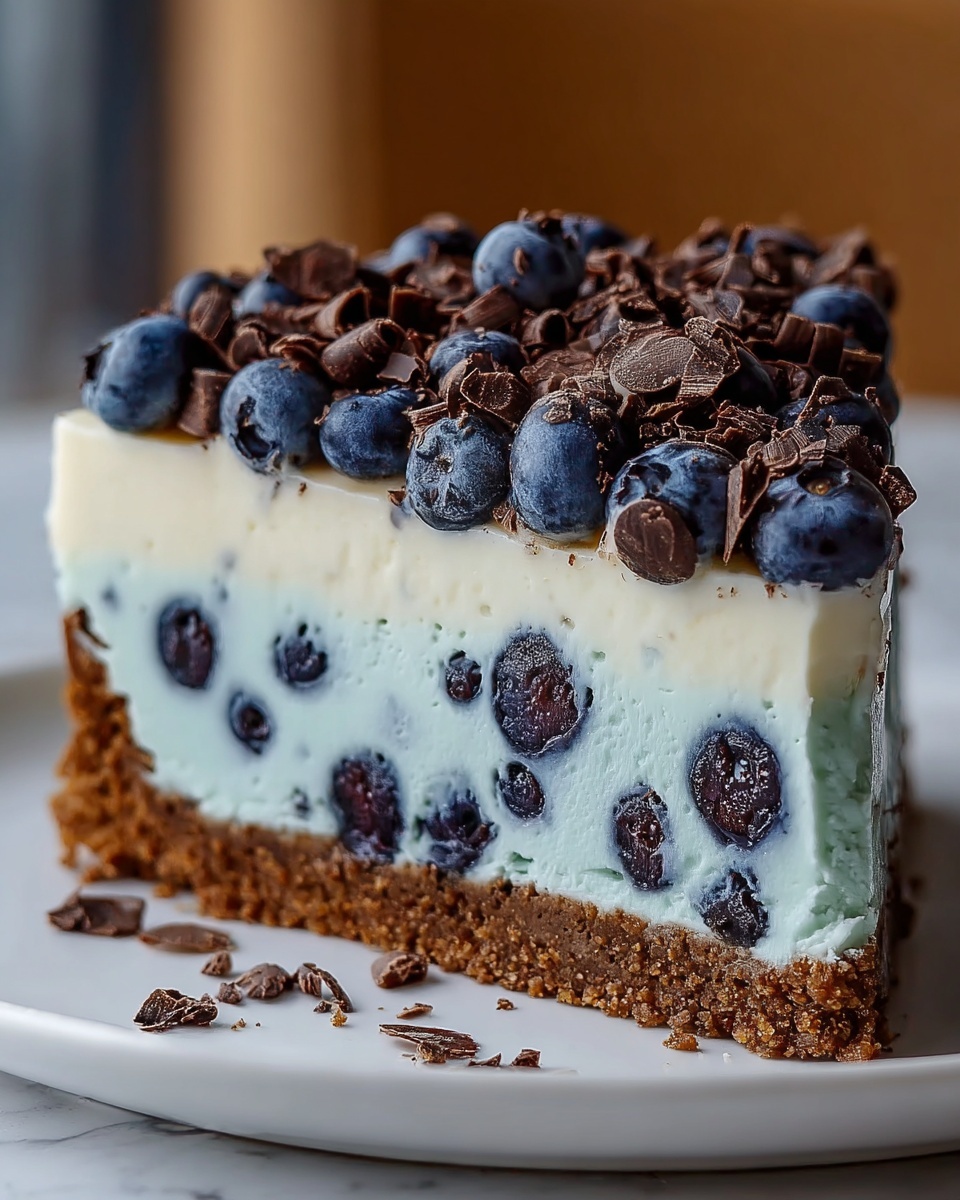
If you’ve ever caught yourself daydreaming about indulging in a dessert that’s as playful as it is delicious, then the Cookie Monster Cheesecake Recipe is about to become your new favorite obsession. This vibrant, blue-hued cheesecake not only looks like it’s straight out of a childhood fantasy but also packs layers of rich cream cheese, chunks of cookies, and an irresistible chocolate crust that will make every bite a joyful celebration. It’s a dessert that captures the fun spirit of the Cookie Monster himself while satisfying grown-up cravings in the most delightful way.
Ingredients You’ll Need
This recipe’s charm lies in its simplicity and the harmonious blend of a few key ingredients, each playing a special role. From the crunchy chocolate sandwich cookies that provide the perfect crust and mix-ins to the rich cream cheese that delivers that silky smooth texture, every component is essential for this delightfully colorful cheesecake.
- Chocolate sandwich cookies (24 total): Use your favorite brand, like Oreos, for a classic base and flavorful chunks throughout.
- Unsalted butter (1/4 cup, melted): This helps bind the cookie crust for a firm, buttery foundation.
- Cream cheese (24 ounces, softened): The creamy heart of your cheesecake that brings that rich, tangy flavor.
- Granulated sugar (1 cup): Adds sweetness and helps with the smooth consistency.
- Sour cream (1 cup): Keeps the cheesecake moist and adds a subtle tang that balances sweetness.
- Large eggs (3): They act as the structure builders, making the cheesecake set perfectly.
- Vanilla extract (1 teaspoon): Enhances the overall flavor with warm, cozy notes.
- Blue gel food coloring: The magic ingredient to achieve that iconic Cookie Monster blue without watering down the batter.
- Mini chocolate chip cookies (1/2 cup): Provides delightful bites of extra crunch and chocolate.
- Crushed chocolate chip cookies (1/2 cup): Adds texture and visual interest within the creamy filling.
- Chopped chocolate sandwich cookies (1/2 cup): More cookie chunks for that satisfying Cookie Monster feel in every forkful.
- Whipped cream and extra cookies for garnish (optional): Perfect for making the presentation feel extra festive and inviting.
How to Make Cookie Monster Cheesecake Recipe
Step 1: Prepare the Crust
Start by preheating your oven to 325°F and lining a 9-inch springform pan with parchment paper at the bottom. Then, take those 24 chocolate sandwich cookies and crush them into fine crumbs using a food processor. Mix the crumbs with melted butter until combined, then press this mixture firmly into the pan’s base. Bake the crust for 10 minutes to set it, then remove it from the oven and let it cool while you prepare the filling.
Step 2: Make the Creamy Cheesecake Batter
In a large bowl, beat together the softened cream cheese and sugar until the mixture is smooth and fluffy—this step is key for a silky texture. Next, blend in the sour cream to add moisture and that slight tanginess. Add the eggs, one at a time, beating well after each addition to ensure everything combines beautifully. Stir in the vanilla extract and then the crowning glory: blue gel food coloring. Add enough to create that unmistakable Cookie Monster blue that lights up this dessert.
Step 3: Fold in Cookie Chunks
Gently fold in the 1/2 cup mini chocolate chip cookies, the crushed chocolate chip cookies, and the chopped chocolate sandwich cookies. This brings delightful texture and surprise bursts of chocolate throughout the creamy blue batter, giving every bite that fun, cookie-packed experience.
Step 4: Bake to Perfection
Pour the finished batter over your pre-baked crust and spread it evenly. Bake the cheesecake for 50 to 60 minutes, checking that the center is just set but still slightly wobbly—that’s the sweet spot for creamy richness. Once baked, turn off the oven and crack the door open, allowing the cheesecake to cool gradually inside for about an hour. This slow cooling helps prevent cracks and keeps the texture flawless.
Step 5: Chill and Garnish
After cooling, transfer the cheesecake to the refrigerator and chill it for at least 4 hours, or better yet, overnight. This resting time lets the flavors meld and the texture firm up perfectly. Before serving, feel free to dress your Cookie Monster Cheesecake Recipe with a dollop of whipped cream and some extra cookies on top for an irresistible finishing touch.
How to Serve Cookie Monster Cheesecake Recipe
Garnishes
The garnishes can transform this cheesecake from delightful to downright spectacular. Whipped cream adds a soft, airy contrast to the dense cheesecake, while extra chunks or whole chocolate sandwich cookies make for a fun, textural element that’s festive and playful. Don’t be shy about piling on those cookie pieces—they bring that signature Cookie Monster flair you-and-your-guests will love.
Side Dishes
The rich and creamy nature of the Cookie Monster Cheesecake Recipe pairs wonderfully with fresh fruit like bright raspberries or strawberries, which add a sweet-tart pop that cuts through the richness. Alternatively, a simple drizzle of chocolate or caramel sauce complements the cookies and cream flavors without overpowering the main event.
Creative Ways to Present
Fancy dinner party or casual gathering, this cheesecake holds up beautifully. Serve it on a decorative cake stand to let that vibrant blue shine. For a fun twist, slice and place servings into mini dessert cups topped with whipped cream and cookie crumbs—perfect for easy individual servings. You can even add edible blue glitter for an extra whimsical effect!
Make Ahead and Storage
Storing Leftovers
Because this cheesecake is rich and dense, it keeps wonderfully in the fridge for up to 5 days when stored in an airtight container. Just be sure to keep it well covered to protect that vibrant blue color and prevent it from picking up any fridge odors.
Freezing
If you want to make this ahead for a party, the Cookie Monster Cheesecake Recipe freezes beautifully. Wrap the entire springform pan with plastic wrap and aluminum foil or slice into individual pieces and freeze them in sealed containers. Frozen cheesecake can last up to 2 months and thaw overnight in the fridge before serving.
Reheating
Since cheesecake is best served chilled, reheating is usually unnecessary. However, if you prefer a softer texture, let slices sit at room temperature for about 20 minutes before serving. Avoid microwaving as it can affect texture and flavor.
FAQs
Can I use regular food coloring instead of gel for the Cookie Monster Cheesecake Recipe?
While regular liquid food coloring can work, it can add extra moisture to the batter and may alter the texture. Gel food coloring is recommended to maintain that thick, creamy consistency and vibrant color.
What type of cookies work best in this cheesecake?
Chocolate sandwich cookies like Oreos are ideal for the crust and mix-ins, but feel free to experiment with gluten-free or dairy-free varieties if needed. Just remember to keep the cookie flavors complementary for the best balance.
How do I prevent my cheesecake from cracking?
To avoid cracks, bake the cheesecake slowly and evenly, ideally in a water bath or with a pan of water placed on the oven rack below. Also, allow it to cool gradually in the oven with the door cracked open before refrigerating.
Can I make mini versions of the Cookie Monster Cheesecake Recipe?
Absolutely! Use muffin tins with liners or mini springform pans and reduce the baking time to about 25–30 minutes. Keep an eye on the centers to ensure they set properly but remain creamy.
Is it possible to make this cheesecake without eggs?
Eggs are crucial for structure and creamy texture, but if you need an egg-free version, consider substituting with reputable egg replacers designed for baking, keeping in mind the texture might be slightly different.
Final Thoughts
Sharing the Cookie Monster Cheesecake Recipe feels like passing on a little slice of joy and nostalgia wrapped in a brilliant blue package. It’s the kind of dessert that sparks smiles and brings everyone together with its playful charm and rich, comforting flavors. Whether you’re baking it for a special occasion or just to brighten a day, this cheesecake promises to delight every single time. Go ahead and give it a try—you won’t regret inviting this fun, cookie-packed treat into your kitchen!
Print
Cookie Monster Cheesecake Recipe
- Prep Time: 20 minutes
- Cook Time: 60 minutes
- Total Time: 6 hours
- Yield: 12 servings
- Category: Dessert
- Method: Baking
- Cuisine: American
- Diet: Vegetarian
Description
This Cookie Monster Cheesecake is a fun and vibrant blue dessert featuring a chocolate sandwich cookie crust and a creamy cheesecake filling studded with mini chocolate chip cookies. Perfect for kids and Oreo lovers, this cheesecake is baked to perfection, chilled for the ideal texture, and optionally garnished with whipped cream and extra cookies for an irresistible finish.
Ingredients
Crust
- 24 chocolate sandwich cookies (like Oreos)
- 1/4 cup unsalted butter (melted)
Filling
- 24 ounces cream cheese (softened)
- 1 cup granulated sugar
- 1 cup sour cream
- 3 large eggs
- 1 teaspoon vanilla extract
- Blue gel food coloring (enough to reach vibrant Cookie Monster blue)
- 1/2 cup mini chocolate chip cookies
- 1/2 cup crushed chocolate chip cookies
- 1/2 cup chopped chocolate sandwich cookies
Garnish (optional)
- Whipped cream
- Extra chocolate sandwich cookies
Instructions
- Prepare the crust: Preheat the oven to 325°F. Line the bottom of a 9-inch springform pan with parchment paper. In a food processor, crush 24 chocolate sandwich cookies into fine crumbs. Mix these crumbs with the melted butter and press the mixture firmly into the bottom of the pan to form the crust. Bake for 10 minutes, then remove and set aside.
- Make the cheesecake filling: In a large bowl, beat the softened cream cheese and sugar together until the mixture is smooth and fluffy. Add the sour cream and mix to combine. Add the eggs one at a time, beating well after each addition to ensure a creamy texture. Stir in the vanilla extract and add blue gel food coloring gradually, mixing until you achieve the vibrant Cookie Monster blue color.
- Add the cookie mix-ins: Gently fold in the mini chocolate chip cookies, crushed chocolate chip cookies, and chopped chocolate sandwich cookies, distributing them evenly throughout the batter without overmixing.
- Bake the cheesecake: Pour the prepared batter over the crust in the springform pan and smooth the surface. Bake the cheesecake for 50 to 60 minutes, or until the center is just set but still slightly wobbly when gently shaken.
- Cool the cheesecake: Turn off the oven and crack the oven door open. Let the cheesecake cool inside the oven for 1 hour to prevent cracking and help it set slowly.
- Chill before serving: Remove the cheesecake from the oven and transfer it to the refrigerator. Chill for at least 4 hours or overnight to allow the cheesecake to fully set.
- Garnish and serve: Before serving, optionally top the cheesecake with whipped cream and extra chocolate sandwich cookies for a decorative and tasty finish.
Notes
- To prevent cracking, bake the cheesecake in a water bath or place a pan of water on the oven rack below the cheesecake pan.
- Use gel food coloring rather than liquid to avoid watering down the batter and to achieve a more vibrant blue color.
- Substitute gluten-free cookies if you want to make a gluten-free version of this cheesecake.


