
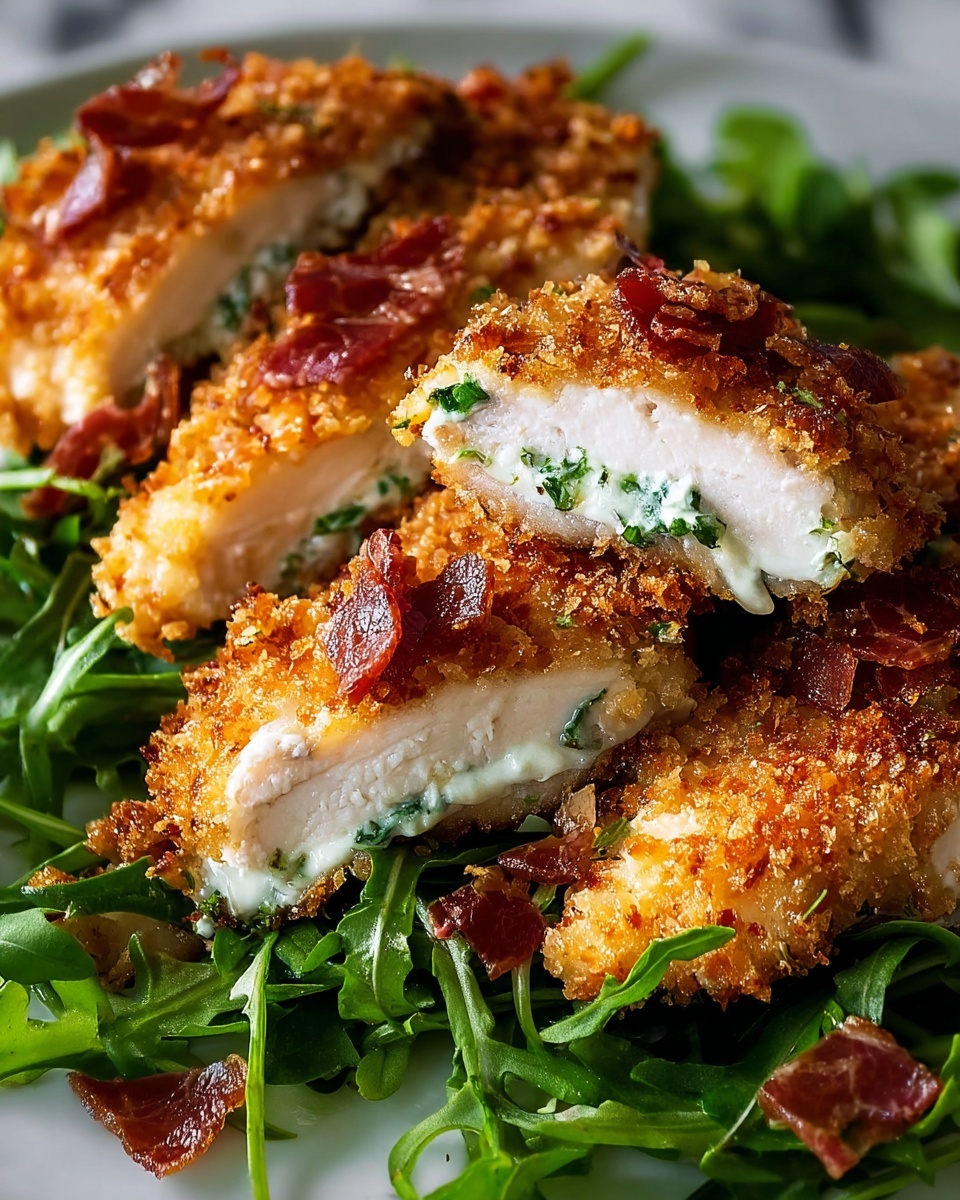
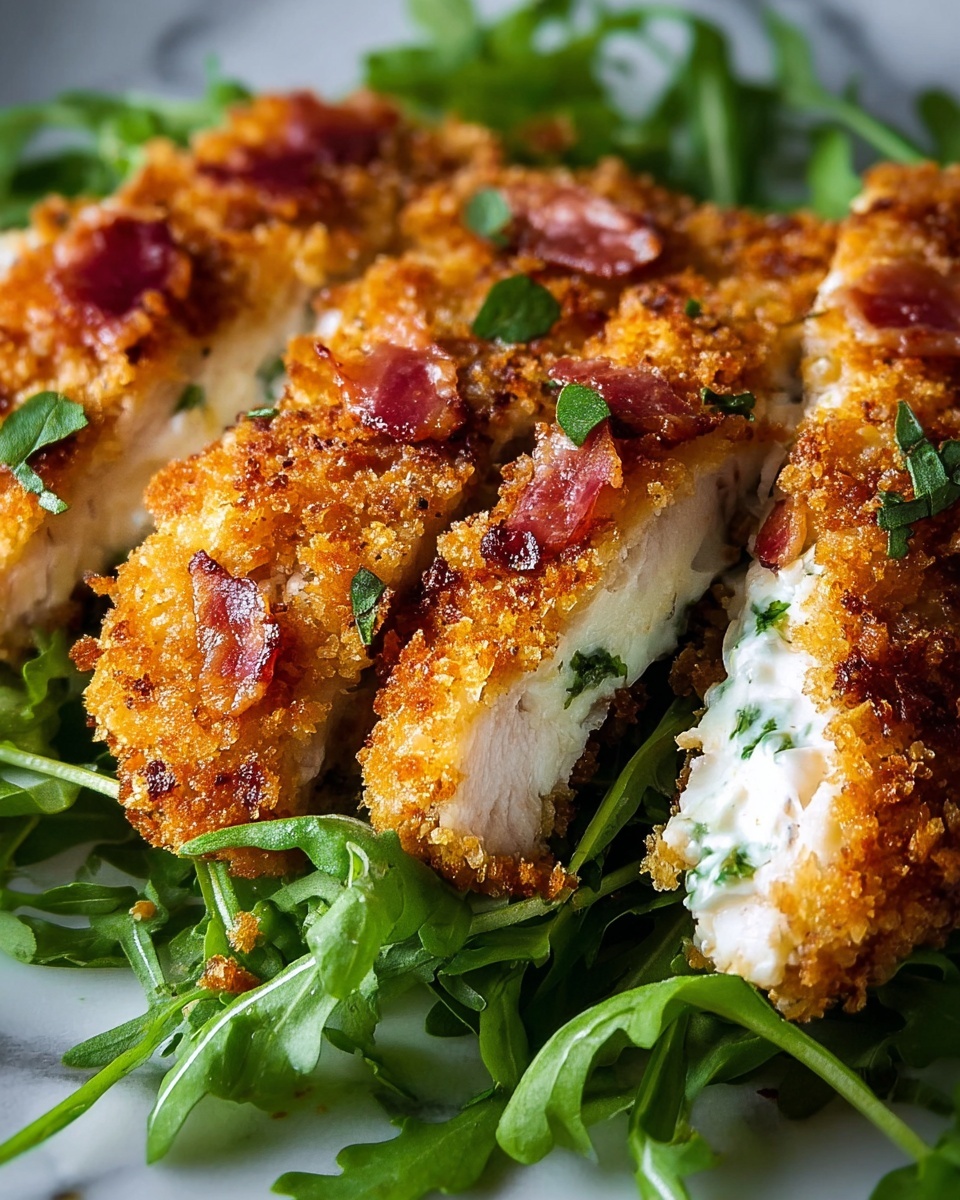
If you’re craving a dish that’s crispy, flavorful, and downright irresistible, look no further than the Panko-Parmesan Chicken Cutlets Recipe. This classic meal combines tender chicken breasts with a crunchy, golden crust made from panko breadcrumbs and nutty Parmesan cheese, all kissed with a hint of garlic and paprika. It’s comfort food elevated to something spectacularly satisfying, perfect for weeknight dinners or impressing guests without much fuss. Once you try this recipe, it will quickly become your new go-to for an easy yet impressive meal!
Ingredients You’ll Need
Gathering the right ingredients is the secret to nailing this dish every time. Each ingredient in this Panko-Parmesan Chicken Cutlets Recipe plays a crucial role — from the tender chicken that forms the hearty base, to the panko and Parmesan that create that unbeatable crunch and flavor.
- 4 boneless, skinless chicken breasts: Pounded to 1/2-inch thickness for even cooking and tenderness.
- 1 cup all-purpose flour: Helps the egg and coating stick perfectly to the chicken.
- 2 large eggs, beaten: Acts as the glue that holds the panko-Parmesan mixture onto the cutlets.
- 1 1/2 cups panko breadcrumbs: Provides a crispy, light texture that’s far superior to regular breadcrumbs.
- 3/4 cup grated Parmesan cheese: Adds a salty, savory depth that makes this recipe truly special.
- 1 tsp garlic powder: Infuses a subtle, aromatic punch to the crust.
- 1/2 tsp paprika: Gives a gentle warmth and gorgeous color to the coating.
- Salt and black pepper, to taste: Essential seasonings to brighten and balance the flavors.
- 1/4 cup olive oil: For frying the cutlets to golden perfection and ensuring a crisp crust.
- Lemon wedges: A fresh burst of tangy brightness when squeezed over the finished cutlets.
- Chopped parsley (optional): Adds a pop of green and fresh herbal notes as garnish.
How to Make Panko-Parmesan Chicken Cutlets Recipe
Step 1: Setting Up Your Dredging Station
Start by organizing your workspace with three shallow dishes — one for flour, one for beaten eggs, and one for the panko-Parmesan spice mixture. Mixing the panko with Parmesan, garlic powder, paprika, salt, and pepper in one bowl ensures every bite is packed with flavor. Having this station ready makes the coating process smooth and mess-free.
Step 2: Coating the Chicken Cutlets
Take each chicken breast and first coat it in flour, shaking off any excess. Then, dip it into the beaten eggs, ensuring it’s fully covered, followed by pressing it firmly into the panko-Parmesan mixture. Make sure to coat both sides evenly — this step creates that spectacular crunch everyone craves in the Panko-Parmesan Chicken Cutlets Recipe.
Step 3: Frying to Golden Perfection
Heat olive oil in a large skillet over medium heat. Once shimmering, gently place the chicken cutlets in the pan, cooking in batches to avoid overcrowding. Fry each side for about 3 to 4 minutes until the crust turns a stunning golden brown and the chicken is cooked through. This frying step locks in juiciness while creating that signature crisp exterior.
Step 4: Draining and Resting
After frying, transfer the cutlets to a paper towel-lined plate to drain off any excess oil. This simple step keeps the crust crisp without being greasy — an important tip that guarantees the best texture for your Panko-Parmesan Chicken Cutlets Recipe every time.
Step 5: Serving Warm
Serve your crispy cutlets immediately while warm, with lemon wedges on the side for squeezing over the top. The citrus adds a bright, fresh contrast that elevates the entire dish. Optionally, sprinkle with chopped parsley for a burst of color and fresh flavor.
How to Serve Panko-Parmesan Chicken Cutlets Recipe
Garnishes
Simple garnishes can transform your plate. A squeeze of fresh lemon juice brings a zesty brightness that pairs perfectly with the rich, cheesy crust. Chopped parsley not only adds a lovely green touch but also a fresh herbal note that cuts through the fried texture beautifully.
Side Dishes
Pair this dish with a crisp green salad or steamed vegetables to balance the richness. Roasted potatoes or creamy mashed potatoes create a hearty, comforting duo. For a lighter option, steamed asparagus or green beans offer a vibrant contrast that complements the crunch and flavor of the cutlets perfectly.
Creative Ways to Present
For a fun twist, try stacking the cutlets with layers of fresh mozzarella, tomato slices, and basil to create a panko-Parmesan chicken parmesan sandwich. Or serve over spaghetti tossed in a light garlic and olive oil sauce for an Italian-inspired dinner. Using lemon wedges as little boats along the plate adds a cheerful and inviting look as well.
Make Ahead and Storage
Storing Leftovers
If you happen to have leftover cutlets, store them in an airtight container in the refrigerator. They will stay fresh for up to 3 days while maintaining great flavor and texture when reheated properly.
Freezing
For longer storage, freeze the cooked chicken cutlets on a baking sheet until solid, then transfer to a freezer-safe bag or container. They can be frozen for up to 2 months without losing too much crispness if reheated with care.
Reheating
Reheat leftover cutlets in a 350°F oven for about 10 minutes or until warmed through to help preserve their crispy crust. Avoid microwaving if possible since it can make the crust soggy. A quick pan-fry on medium heat also revives the crunch nicely.
FAQs
Can I use chicken thighs instead of breasts?
Absolutely! Boneless, skinless chicken thighs can be used for juicier results, but pound them to an even thickness for best frying results. The Panko-Parmesan Chicken Cutlets Recipe works well with thighs and adds a richer flavor.
What if I don’t have panko breadcrumbs?
You can substitute regular breadcrumbs, but panko’s light and airy texture is what gives this recipe its signature crunch. If using regular breadcrumbs, expect a denser crust but still tasty.
Is this recipe gluten-free?
To make it gluten-free, substitute the all-purpose flour and panko breadcrumbs with gluten-free versions. Make sure your Parmesan cheese and spices don’t contain hidden gluten additives.
Can I prepare the cutlets ahead of time and fry later?
Yes! You can coat the chicken and refrigerate it for a few hours or overnight before frying. Just allow them to come to room temperature briefly before frying for even cooking and crispness.
How do I know when the chicken is cooked through?
Chicken should reach an internal temperature of 165°F. The exterior will be golden and crispy, and the cutlets will feel firm but juicy when pressed gently.
Final Thoughts
There’s something incredibly satisfying about the crunch and flavor burst you get from this Panko-Parmesan Chicken Cutlets Recipe. It’s approachable for any cook but impressive enough for company, and it’s a dish that hits the spot every single time. Give it a try — your dinner table will thank you!
Print
Panko-Parmesan Chicken Cutlets Recipe
- Prep Time: 10 minutes
- Cook Time: 20 minutes
- Total Time: 30 minutes
- Yield: 4 servings
- Category: Main Course
- Method: Frying
- Cuisine: American
Description
This Panko-Parmesan Chicken Cutlets recipe delivers crispy, golden-brown chicken breasts coated in a flavorful blend of panko breadcrumbs and Parmesan cheese. Perfectly seasoned and pan-fried to a tender finish, these cutlets are served warm with tangy lemon wedges and optional fresh parsley for a delicious and easy weeknight meal that the whole family will love.
Ingredients
Chicken and Coating
- 4 boneless, skinless chicken breasts, pounded to 1/2-inch thickness
- 1 cup all-purpose flour
- 2 large eggs, beaten
- 1 1/2 cups panko breadcrumbs
- 3/4 cup grated Parmesan cheese
- 1 tsp garlic powder
- 1/2 tsp paprika
- Salt and black pepper, to taste
Cooking
- 1/4 cup olive oil (or more, for frying)
Serving
- Lemon wedges, for serving
- Chopped parsley, for garnish (optional)
Instructions
- Prepare the dredging stations: Set up three shallow dishes—one with all-purpose flour, the second with beaten eggs, and the third with a mixture of panko breadcrumbs, grated Parmesan cheese, garlic powder, paprika, salt, and black pepper. This setup will make the coating process seamless.
- Coat the chicken: Take each pounded chicken cutlet and first dredge it in the flour, shaking off any excess. Next, dip it into the beaten eggs to moisten, then press it firmly into the panko-Parmesan mixture, ensuring both sides are thoroughly coated for maximum crispiness and flavor.
- Heat the oil and cook the cutlets: Warm the olive oil in a large skillet over medium heat. Once the oil is hot, add the coated chicken cutlets in batches to avoid overcrowding the pan. Fry each cutlet for 3 to 4 minutes per side, or until they develop a golden brown crust and are cooked through to an internal temperature of 165°F (75°C).
- Drain excess oil: Transfer the cooked cutlets onto a plate lined with paper towels to absorb any excess oil, ensuring the cutlets stay crispy and not greasy.
- Serve: Serve the chicken cutlets warm with lemon wedges on the side to add a zesty brightness. Garnish with chopped parsley if desired, enhancing the dish’s freshness and presentation.
Notes
- For even cooking, pound the chicken breasts to an even 1/2-inch thickness before coating.
- Use fresh Parmesan cheese for the best flavor and texture in the breadcrumb mixture.
- Adjust seasoning in the breadcrumb mixture according to your taste preferences.
- Do not overcrowd the pan while frying to maintain oil temperature and crispiness.
- Check doneness by ensuring chicken reaches an internal temperature of 165°F (75°C).
- Leftovers can be reheated in the oven to preserve crispness instead of the microwave.

