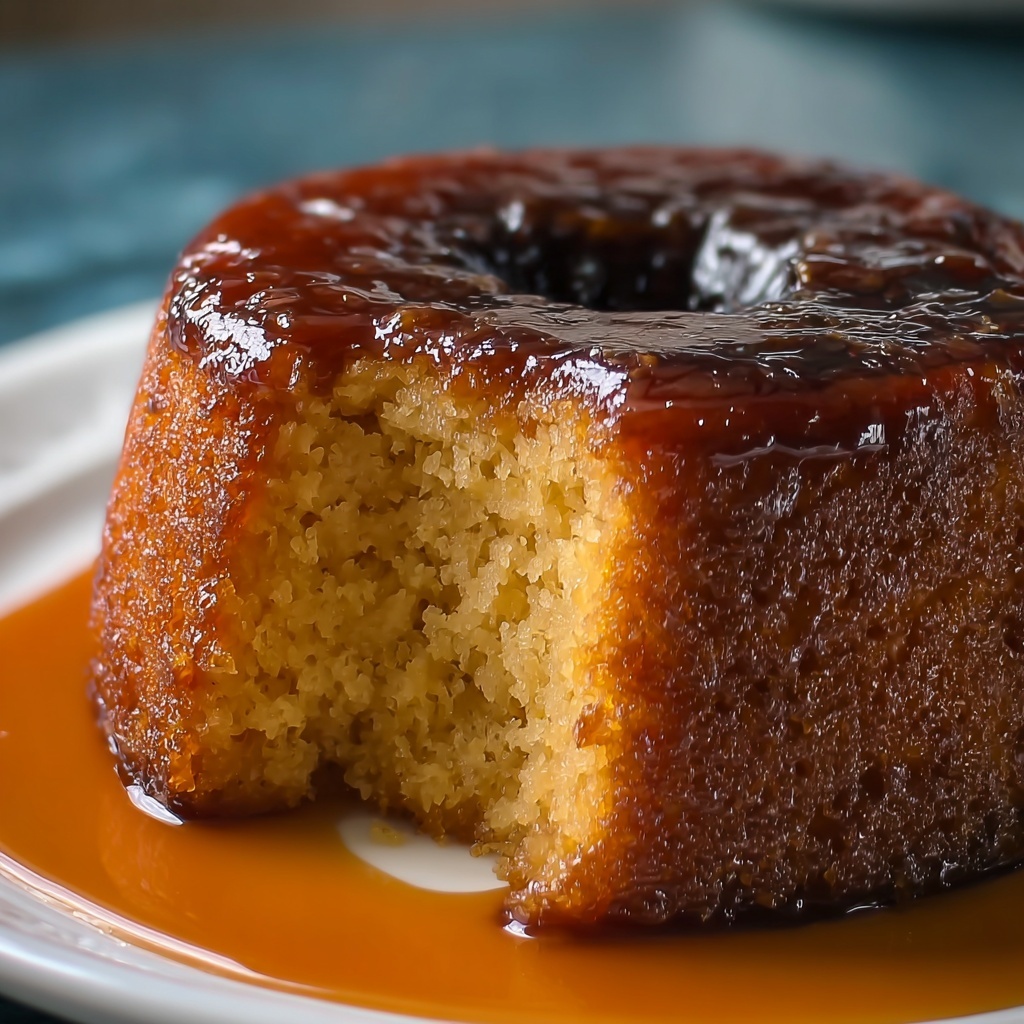
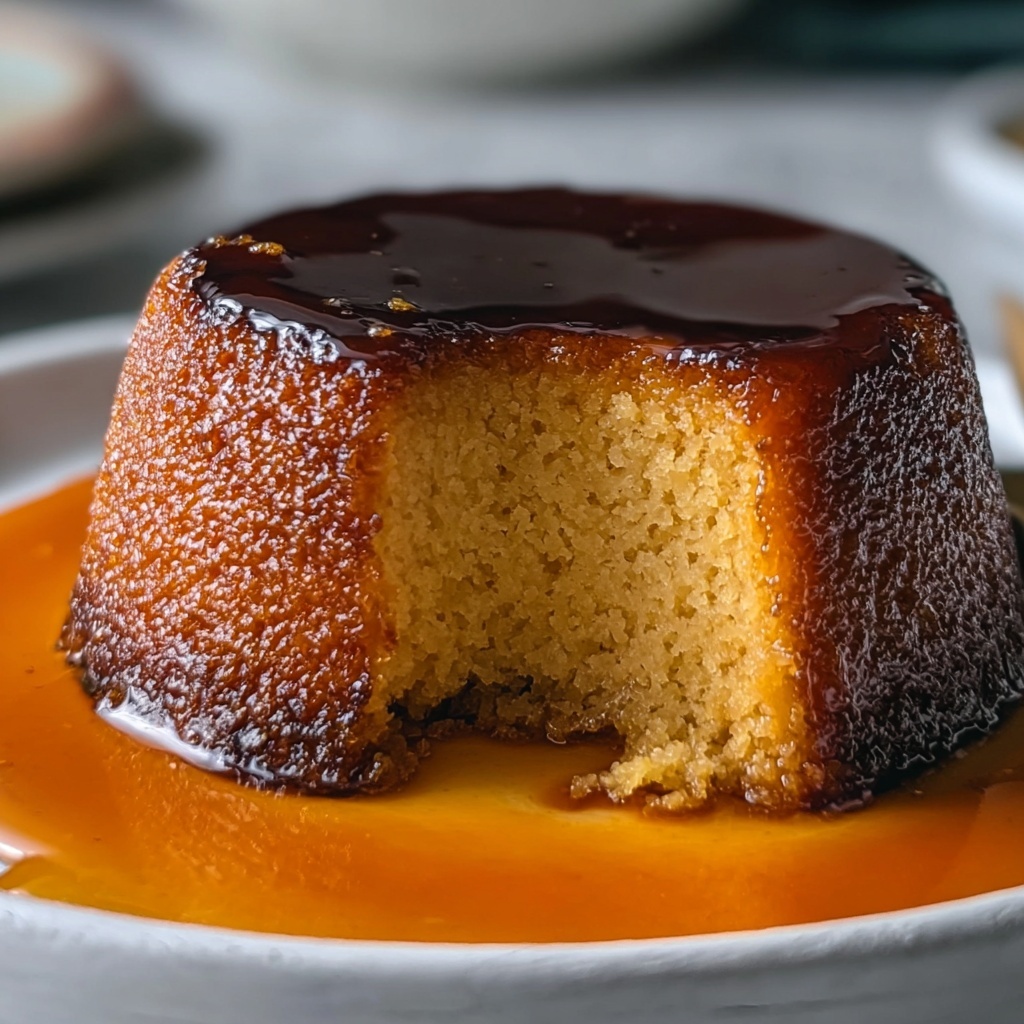
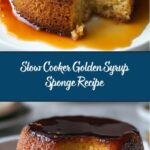
If you’re someone who delights in the comforting embrace of a warm, syrupy dessert, then the Slow Cooker Golden Syrup Sponge Recipe is about to become your new go-to favorite. This lovely British classic transforms with the magic of slow cooking, resulting in a moist, fluffy sponge sitting atop a luscious pool of rich golden syrup. The slow cooker makes the process delightfully hands-off, perfect for filling your home with cozy aromas without having to hover over the oven. Whether it’s a Sunday treat or a sweet ending to a busy day, this dessert has a heartwarming charm that’s simply irresistible.

Ingredients You’ll Need
Gathering the right ingredients is surprisingly simple and every single one plays an essential role in the success of this dessert. From the butter’s richness to the golden syrup’s deep caramel tones, each element blends perfectly to create the classic taste and texture that makes the Slow Cooker Golden Syrup Sponge Recipe so special.
- Unsalted butter (1/2 cup or 125g): Softened to allow easy creaming with sugar, it adds richness and keeps the sponge tender.
- Granulated sugar (1/2 cup or 100g): Sweetens the sponge while helping create a light, fluffy texture.
- Large eggs (2): Bind the batter and provide structure while contributing to a golden color.
- Self-raising flour (1 cup or 125g): Provides the rise needed for a soft and airy sponge.
- Milk (1/4 cup or 60ml): Keeps the batter smooth and moist without weighing it down.
- Vanilla extract (1 tsp): Brings a warm, sweet aroma that complements the golden syrup beautifully.
- Golden syrup (1/3 cup or 100g plus extra for drizzling): The star ingredient, offering that distinctive rich, caramel flavor beneath the sponge.
How to Make Slow Cooker Golden Syrup Sponge Recipe
Step 1: Prepare Your Pudding Basin
Begin by greasing a pudding basin or any heatproof bowl that comfortably fits inside your slow cooker. This step is vital to ensure your sponge releases smoothly when it’s ready, avoiding any frustrating sticking.
Step 2: Add the Golden Syrup
Pour the measured golden syrup straight into the bottom of the prepared basin, setting the base layer for that warm, caramelized pool of goodness underneath the sponge.
Step 3: Cream Butter and Sugar
Using a bowl, cream together the softened butter and sugar until the mixture is light and fluffy. This process incorporates air, crucial for creating a sponge that rises well and has a delightful texture.
Step 4: Beat in the Eggs and Vanilla
Add eggs one at a time, beating well after each addition to maintain the smoothness of the batter. Stir in the vanilla extract, which will infuse the sponge with a comforting, aromatic sweetness.
Step 5: Fold in Flour and Milk
Gently fold in the self-raising flour, alternating with the milk. This careful mixing keeps the batter light and smooth, preventing you from overworking the flour and making the sponge tough.
Step 6: Combine Batter and Syrup
Carefully spoon the prepared batter over the golden syrup in your basin. Try to cover the syrup evenly without mixing, as the syrup will create a deliciously sticky base for the sponge as it cooks.
Step 7: Cover and Prepare for Slow Cooking
Cover the basin tightly with foil or a fitted lid to keep the steam in, which ensures the sponge cooks gently and thoroughly within the slow cooker.
Step 8: Set Up the Slow Cooker
Place the covered basin into the slow cooker, then pour boiling water into the slow cooker base until it reaches halfway up the sides of the basin. This water bath helps to cook the pudding evenly, mimicking traditional steaming.
Step 9: Cook Low and Slow
Cover the slow cooker with its lid and cook on high for about 2.5 to 3 hours. You’ll know it’s done when the sponge feels set and springy to the touch, with the syrup bubbling underneath.
Step 10: Serve and Enjoy!
Carefully lift the hot basin out using oven mitts, remove the foil, and invert the sponge onto a serving plate. Drizzle a little extra golden syrup on top and serve warm for that perfect melt-in-your-mouth experience.
How to Serve Slow Cooker Golden Syrup Sponge Recipe
Garnishes
A simple dusting of powdered sugar or a few fresh berries can brighten the plate beautifully, adding a pop of color and freshness that contrasts the rich syrupy base.
Side Dishes
This sponge pairs wonderfully with creamy extras like custard, clotted cream, or even a scoop of vanilla ice cream, which balances the dense sweetness with a cool, smooth texture.
Creative Ways to Present
Try serving individual portions in small ramekins for a charming touch, or add a sprig of mint on top for a fresh twist. For special occasions, a drizzle of warm caramel sauce alongside the golden syrup can elevate this classic dessert even more.
Make Ahead and Storage
Storing Leftovers
Once cooled, wrap any leftover sponge tightly with plastic wrap or store in an airtight container to maintain moistness. It will keep well in the refrigerator for up to 3 days, perfect for quick indulgence later.
Freezing
The Slow Cooker Golden Syrup Sponge Recipe also freezes wonderfully. Slice into portions, wrap individually in cling film and foil, then freeze for up to 2 months. This way, you always have a comforting dessert ready to warm up.
Reheating
To reheat, place slices in a microwave-safe dish covered with a damp paper towel and heat gently until warmed through. Alternatively, warm in the oven wrapped loosely in foil to keep moisture locked in while heating evenly.
FAQs
Can I use regular syrup instead of golden syrup?
While regular syrup will add sweetness, golden syrup has a unique molasses-like flavor and thicker texture that is essential to the classic taste of this dish. For best results, stick with golden syrup.
What if I don’t have a pudding basin?
Any heatproof bowl or oven-safe dish that fits inside your slow cooker will work perfectly. Just make sure it’s not too large and has enough depth to hold the batter and syrup.
Can I make this in a regular oven?
Absolutely! You can bake this sponge in a pudding basin with a water bath in a 325°F (160°C) oven for about 1.5 to 2 hours until set and springy.
Is it necessary to use self-raising flour?
Self-raising flour helps the sponge rise and become light. If you only have plain flour, add 1.5 tsp baking powder to the flour before mixing to achieve similar results.
How do I know when the sponge is cooked?
It should be springy to the touch and no longer wobbly in the center. A skewer inserted should come out clean or with just a few moist crumbs, but not raw batter.
Final Thoughts
There is something truly magical about the way the Slow Cooker Golden Syrup Sponge Recipe turns simple ingredients into a delicious, memorable treat full of warmth and nostalgia. It’s an easy, rewarding dessert that invites sharing and savoring with loved ones. I absolutely encourage you to give this recipe a try—you might just find it becoming a beloved staple in your kitchen too!
Print
Slow Cooker Golden Syrup Sponge Recipe
- Prep Time: 15 minutes
- Cook Time: 2 hours 30 minutes
- Total Time: 2 hours 45 minutes
- Yield: 6 servings
- Category: Dessert
- Method: Slow Cooking
- Cuisine: British
Description
A classic British dessert made easy with a slow cooker, this Golden Syrup Sponge pudding features a light, fluffy sponge steamed over a rich layer of buttery golden syrup. Perfectly moist and bursting with caramelized sweetness, it’s an uncomplicated treat ideal for cozy nights in.
Ingredients
For the Sponge
- 1/2 cup (125g) unsalted butter, softened
- 1/2 cup (100g) granulated sugar
- 2 large eggs
- 1 cup (125g) self-raising flour
- 1/4 cup (60ml) milk
- 1 tsp vanilla extract
For the Syrup
- 1/3 cup (100g) golden syrup (plus extra for drizzling)
Instructions
- Prepare the Basin: Grease a pudding basin or heatproof bowl that fits inside your slow cooker to ensure the sponge doesn’t stick.
- Add Golden Syrup: Pour the golden syrup into the base of the prepared basin, which will create a delicious caramel layer once inverted.
- Cream Butter and Sugar: In a mixing bowl, cream together the softened butter and granulated sugar until the mixture becomes light and fluffy, which helps incorporate air for a tender sponge.
- Incorporate Eggs and Vanilla: Beat in the eggs one at a time to maintain the emulsion, then stir in the vanilla extract to add aromatic flavor.
- Fold in Flour and Milk: Gradually fold the self-raising flour into the mixture, alternating with milk, to create a smooth, thick batter without overmixing.
- Assemble Batter: Spoon the batter gently over the golden syrup in the pudding basin, avoiding mixing the layers.
- Seal and Place in Slow Cooker: Cover the basin tightly with foil or a suitable lid, then place it into the slow cooker.
- Add Boiling Water: Pour boiling water into the slow cooker until it reaches halfway up the sides of the pudding basin, creating a water bath for even steaming.
- Cook the Sponge: Cover the slow cooker and cook on high for 2.5 to 3 hours, until the sponge is set, springy to touch, and cooked through.
- Serve: Carefully remove the basin from the water, discard the foil, invert the sponge onto a serving plate so the golden syrup layer is on top, drizzle with extra golden syrup if desired, and serve warm.
Notes
- Ensure the pudding basin fits comfortably inside your slow cooker before starting.
- Be cautious when handling the hot water bath to avoid spills and burns.
- Cooking times may vary depending on your slow cooker model; start checking at 2.5 hours.
- Extra golden syrup can be warmed slightly before drizzling for a more fluid topping.
- Serve with custard or cream for an indulgent treat.